1. Stage Equipment
Use the guideline for identifying what testing requirements are needed.
Note: See Appendix A
| Step | Action |
|---|---|
| 1.1 | Position Air Compressor on flat ground, upwind or side wind of the job, and far enough away from blasting area to prevent damage, but close enough to work efficiently.
Note: Flag off area where blasting equipment is positioned and blasting |
| 1.2 | Position Blast Pot on flat ground, upwind or side wind of the job, and far enough away from blasting area to prevent damage but close enough to work efficiently. |
2. Hook Up Hoses to Blasting System
Complete these steps to set up hoses.
Note: See Appendix A, B, C and D
! CAUTION: Inspect all equipment for damage. If damage is present, replace and report to supervision.
! CAUTION: Ensure all hoses are in good condition and hose gaskets are in place prior to connecting. All hose connections must have whip checks and safety pins in place.
! CAUTION: Do not drop or slam couplers and nozzles.
! CAUTION: Double wire or pin all couplers.
! CAUTION: When rigging blast line overhead, make sure it is secure.
| Step | Action |
|---|---|
| 2.1 | Hook up air supply line (sized sufficiently for blast nozzle) to the compressor.
Note: Use whip check to secure at that connection Note: Refer to Appendix D for sizing clarification |
| 2.2 | Blow airline out to remove debris.
! CAUTION: When blowing out airline, have one person hold the hose securely while a second person cracks the valve open just enough to clear hose. |
| 2.3 | Hook up air supply line to pot.
Note: Always use whip check and safety pins or wires |
| 2.4 | Establish how much blasting hose is needed. |
| 2.5 | Connect first hose to blast pot.
Note: Use whip check and safety pins or wires at each connection Note: Ensure hoses are run as straight as possible and avoid tight curves. |
| 2.6 | Add sections of blast hose as needed and attach whip to reach blast area.
Note: Ensure there is a sufficient amount of hose to do work efficiently Note: Ensure whip has proper size nozzle Note: Refer to Appendix D for nozzle sizing clarification |
| 2.7 | Attach control (deadman) to nozzle |
| 2.8 | Attach blast light when necessary |
| 2.9 | Attach the twin-line line to the deadman and run it along the hose, back to the blast pot. |
| 2.10 | Attach the control line to blast hose with duct tape every foot for the first 50 ft. Note: Leave slack in control line to allow for movement between the two hoses |
| 2.11 | After 50 ft, tape every 2 ft.
Note: Leave slack in control line to allow for movement between the two hoses |
| 2.12 | Hook the control line into the blast machine. |
3. Hook Up Breathing Air
Complete these steps when hooking up breathing air.
Note: See Appendix A
| Step | Action |
|---|---|
| 3.1 | Attach Chicago supply line to the compressor.
! CAUTION: Always esure a CO monitor is in place to verify good air quality for breathing. |
| 3.2 | Blow airline out to remove debris.
! CAUTION: When blowing out airline, one person should hold the hose securely while a second person cracks the valve open |
| 3.3 | Hook Chicago line to breather.
Note: Use whip check and safety pins at all times |
| 3.4 | Attach dedicated breathing airline from breather to work area to supply blast hoods with breathing air |
4. Stage Blast Media
Complete these steps when staging blast media.
| Step | Action |
|---|---|
| 4.1 | Stage blast media as close to the blast pot as possible.
Note: This requires manually moving 80 lb bags of blast media, so it is important to ensure there are no tripping hazards between the blast media and the blast pot. |
5. Set Up the Blast Machine
Complete these steps to set up the blast machine.
Note: See Appendix B
| Step | Action |
|---|---|
| 5.1 | Verify manual control valve is turned to the OFF position |
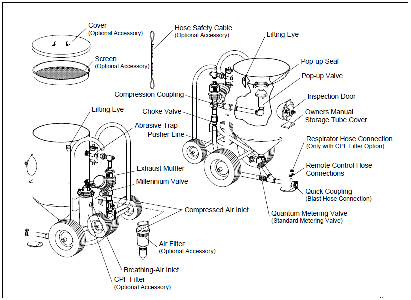
| 5.2 | With Clemco style blast pots – abrasive trap must be cleaned twice a day. First before blasting and half way through blasting See Appendix B. |
| 5.3 | Verify that the choke valve on the pusher line is turned ON |
| 5.4 | Verify that the metering valve is in the correct position so as to get the right amount of blast media.
Note: Adjustment may need to be made during blasting startup. |
| 5.5 | Fill the blast machine with blast media.
Note: Ensure a screen is in place to prevent unwanted objects from entering Note: Do not fill media above plunger to prevent leaking and damage. ! CAUTION: Blast media is heavy. Use proper lifting ! CAUTION: To avoid serious injury never put your |
| 5.6 | Put the lid back on the blast machine. |
6. Start Up of Blast Machine
Complete these steps to startup the blast machine.
Note: See Appendix B
| Step | Action |
|---|---|
| 6.1 | Turn ON air supply from compressor. |
| 6.2 | Ensure blaster is prepared and the deadman control is in the OFF position.
Note: Refer to Appendix E for hand signal communication gestures, |
| 6.3 | Turn ON the manual control at the blast machine.
! CAUTION: The system is now live and will be controlled by the blaster until the manual control at the blast machine is turned OFF. ! CAUTION: If any problems arise, immediately turn off manual control at blast machine. |
7. Operating Blast Machine
Complete these steps to operate the blast machine.
| Step | Action |
|---|---|
| 7.1 | Ensure correct amount of blast media is being used. You may need to adjust the metering valve to allow more or less media to flow through.
Note: Blaster may give hand signals to turn grit up or down. Two fingers pointing up signals more media. Two fingers pointing down signals less media. Note: A surging sound indicates too much blast media. A whistling sound indicates too little blast media. |
| 7.2 | If a plug in the system occurs, you may need to “choke” the blast system by turning off the air supply to the pusher line.
Note: There are typically 2 ways for the blaster to signal they need a choke.
Note: First attempt, choke for approximately 2 seconds. If that does not clear the system, follow up with longer chokes until normal blasting resumes. |
| 7.3 | During blasting process, assist the blaster by:
! CAUTION: Safety of Mandros personnel is our primary concern. Never enter an unsafe environment to assist |
8. Loading Blast Machine
Complete these steps to refill the equipment.
! WARNING – During start up and shut down blast media may blow around stand back and face away from the blast pot and exhaust muffler.
! WARNING – During start up and shut down ALWAYS ensure good communication with blaster and verify they know when you are turning on the blast machine.
! WARNING – During start up if the blast machine turns on as soon as you turn the control valve on, there may be a problem, the blaster should be the one turning the system on at the deadman, the blaster may have left the deadman control on or the deadman control may have been placed in a way that the deadman control is inadvertently in the on position. Immediately turn the blast machine off and check the situation to ensure the blaster has control of the hose before turning the blast machine on at the pot.
| Step | Action |
|---|---|
| 8.1 | When blaster runs out of blast media, turn OFF blast machine. |
| 8.2 | Remove lid. |
| 8.3 | Fill the blast machine with blast media.
Note: Ensure a screen is in place to prevent unwanted objects from entering blast machine. Note: Do not fill media above plunger to prevent leaking and damage. ! CAUTION: Blast media is heavy. Use proper lifting techniques to avoid injury. |
| 8.4 | Put the lid back on the blast machine. |
| 8.5 | Turn the manual control back ON to resume blasting. |
9. Shutting Down Blast Operation for Day (To Resume Tomorrow)
Complete these steps to shut down the equipment for day.
| Step | Action |
|---|---|
| 9.1 | Turn OFF manual control valve. |
| 9.2 | Turn OFF air supply to the blast machine and allow air pressure to bleed off. |
| 9.3 | Turn OFF air supply to breathing system and bleed off air pressure.
! CAUTION: NEVER turn off breathing air system when in use by blaster. Verify blaster is in safe location with blast hood off before shutting down. |
| 9.4 | Roll up blast hose and breather hose.
Note: If long sections of hose are utilized or staged where rolling up entire |
| 9.5 | Put the lid on the blast machine |
| 9.6 | Cover blast media to prevent weather damage (getting wet). |
10. Shutting Down Blast Operation for the Job
Complete these steps to shut down the equipment for the job.
| Step | Action |
|---|---|
| 10.1 | Verify the blast machine is empty.
Note: This should be done during the last part of blasting. |
| 10.2 | Turn OFF manual control valve. |
| 10.3 | Put the lid on the blast machine. |
| 10.4 | Turn OFF air supply to the blast machine, bleed off air pressure, and disconnect hoses from compressor and blast pot. |
| 10.5 | Turn OFF air supply to breathing system, bleed off air pressure, and disconnect hoses from compressor and breather. |
| 10.6 | Disconnect control line from blast machine and blast hose. Note: Leave control line hooked up to whip section and roll it up with the whip. |
| 10.7 | Disconnect blast hoses. |
| 10.8 | Roll up all hoses and tape to keep in place.
Note: If any hoses are defective or need repairs, either repair in the field |
| 10.9 | Load up equipment and supplies for the next job or return to the shop.
Note: If returning to shop, ensure that everything gets put away in its proper Note: Loading heavy equipment may require additional personnel or lifting equipment (forklift). Note: Ensure that the loads are secure for transportation. |
| 10.10 | Ensure any blast media left over is covered to prevent damage and stored properly. |
11. Appendix A: Blast Set Up

12. Appendix B: Blast Machine Diagram
13. Appendix C: Control System Diagram

14. Appendix D: Abrasive and Air Consumption Chart

15. Appendix E: Hand Signals
Start Up or Turn On – Hand or finger pointing up in a back and forth spinning motion.
Shut Down or Turn Off – Hand gesture back and forth across neck
Choke – Hand at neck choking gesture
Turn Abrasive Up – Two fingers pointing up
Turn Abrasive Down – Two fingers pointing down