1. Stage Equipment
Use the guideline for initial positioning of the equipment:
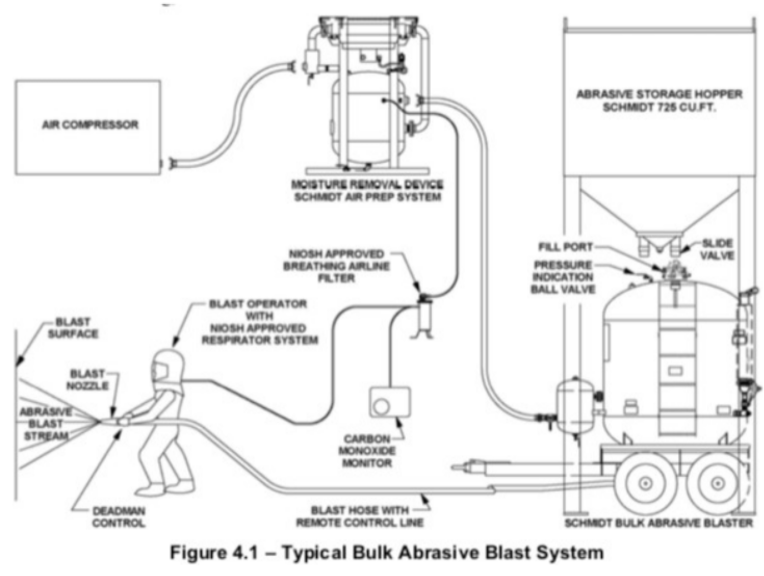
Note: See Appendix A
| Step | Action |
| 1.1 | Position air compressor on flat ground, upwind or side wind of the job, and far enough away from blasting area to prevent damage but close enough to work efficiently. Note: Flag off area where blasting equipment is positioned and blasting operations are performed to keep unauthorized personnel out of harm’s way. |
| 1.2 | Position blast pot on flat ground, upwind or side wind of the job, and far enough away from blasting area to prevent damage but close enough to work efficiently. ! CAUTION: Ensure there is sufficient area and stable flat ground for forklift to maneuver when staging equipment and filling the blast pot. ! CAUTION: When moving bulk blast pots ensure that they are empty enough to be moved safely. ! CAUTION: Ensure forklift has sufficient capacity to handle the weight of the pot and any left over media that may be inside. |
2. Set Up the Blast Machine
Complete these steps to set up the blast machine:
| Step | Action |
| 2.1 | Extend safety loading rack to working position • Step 1: remove retaining pins • Step 2: using forklift, lift cage into position • Step 3: reinstall retaining pins Note: Forklift Required |
| 2.2 | Hook up air supply line (sized sufficiently for blast nozzles) to the compressor Note: Use whip check to secure at that connection ! CAUTION: Ensure hammer fittings are tight |
| 2.3 | Blow airline out to remove debris and moisture. ! CAUTION: DO NOT use full pressure. Crack the hose to let out only enough air to clear hose. |
| 2.4 | Hook up air supply line to blast machine. Note: Use whip check to secure at that connection ! CAUTION: DO NOT turn air supply on at this point. ! CAUTION: Ensure hammer fittings are tight |
| 2.5 | Run control power from blast pot to power source (some systems will use a 110-volt power supply, others will be powered from a battery on another piece of equipment). Note: To prevent draining batteries on equipment only hook up power supply when equipment is running |
3. Hook Up Hoses to Blasting System
Complete these steps when hooking up hoses to the blasting system:
CAUTION: Inspect all equipment for damage. If damage is present, replace and report to supervision. Tag equipment if damaged.
Note: Hoses should be built one at a time and color coded to ensure the correct control line controls the correct blast hose.
! CAUTION: Ensure all hoses are in good condition and hosegaskets are in place prior to connecting.
Note: Worn hoses are prone to blowouts that could cause an injury and will
cause production inefficiencies. When hoses are hung in the air or will be used in particularly difficult to access areas it is crucial to use newer hoses that are in very good condition.
! CAUTION: Do not drop or slam couplers and nozzles.
! CAUTION: When rigging blast line overhead, make sure it is securely tied off. Pulling hoses up or lowering hoses must be properly flagged. Consult foremen for appropriate flagging.
Note: Hose must be tied off in a manner that reduces tight bends and the chance of kinking
Note: When tying off blast hoses ensure the control line is tied off separately. Blast hoses expand when in use which could cause damage or malfunction of the control line or the blast light.
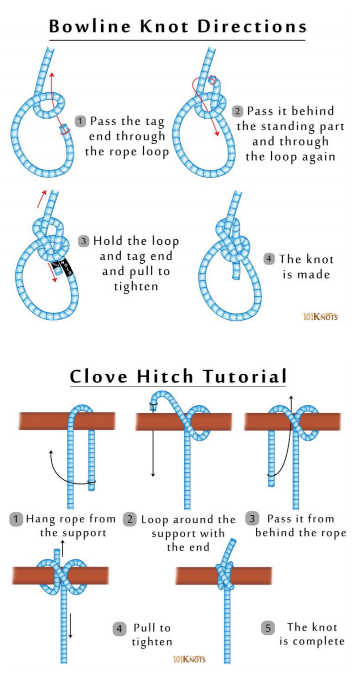
Note: Blast hose should always be tied off using clove hitch knots. (See Appendix C)
Note: When tie off point allows full engagement of rope (handrail or tubing) use clove hitch knots. When tying off to irregular shapes such as angle iron, use bowline knots. (See Appendix C)
Note: Blast hose should be tied off in a manner that allows the rope and the hose to carry the weight and does not require the coupler to carry the load.
Note: Run blast hoses through handrails (not over) to avoid sharp turns / corners.
| Step | Action |
| 3.1 | Establish how much blasting hose is needed for each outlet. |
| 3.2 | Stage hoses from work area to blast machine. Note: Depending on the project, hoses may be built starting at the blast machine or at the nozzle. Refer to foreman for guidance. Note: Hoses should always be run as straight as possible. Tight radius turns increase abrasive impact in the blast hose, wearing it out quicker. Tight turns also require more air pressure to propel the air/abrasive mixture. |
| 3.3 | Connect sections of blast hose as needed & connect whip. ! WARNING: The blast hose and control line must ALWAYS be attached to their corresponding connections. If by accident, a control line is connected to the wrong blast hose outlet, a blaster could inadvertently turn on the wrong hose. |
| 3.4 | Ensure whip has properly sized nozzle. ! CAUTION: All hose connections must have whipchecks and safety pins in place. Double wire or pin all couplers. |
| 3.5 | Attach control (deadman) to nozzle Note: when whips are already built disregard this step and ensure deadman is properly secured to nozzle |
| 3.6 | Attach blast light when required Note: when whips are already built disregard this step and ensure light is properly secured to nozzle |
| 3.7 | Run the control line and blast light power cord along the hose, back to the blast pot and attach to the blast machine. |
| 3.8 | Attach the control line/power cord to blast hose with duct tape every foot for the first 50 ft. Note: Leave slack in control line to allow for movement Note: Tape every foot for first 50 ft OR to as much of the hose as needed in working area. |
| 3.9 | Tape every 2 ft for remainder of hose or as needed for efficiency and safety. Note: Leave slack in control line to allow for movement |
| 3.10 | Connect hose to blast pot |
| 3.11 | Verify manual control switch is turned to the OFF position. |
| 3.12 | Plug the control line into the appropriate outlet on blast machine. |
| 3.13 | Repeat Steps 3.2 – 3.10 for each additional hose, one at a time, color coding individually. |
4. Hook Up Breathing Air
Complete these steps to hooking up breathing air:
| Step | Action |
| 4.1 | Attach air supply hose to the compressor. ! CAUTION: Make sure there is a CO monitor in place to verify good air quality for breathing. |
| 4.2 | Blow out the air supply hose to remove debris and moisture. ! CAUTION: When blowing out airline, one person should hold the hose securely while a second person cracks the valve open just enough to clear the hose of any debris. |
| 4.3 | Hook air supply hose to breather. Note: Use whip check and safety pins at all times |
| 4.4 | Hook dedicated breathing airline from breather to work area to supply blast hoods with breathing air. |
5. Loading the Blast Machine
Complete these steps to load and unload the blast machine:
CAUTION: Fall protection required when climbing blast pot ladder. Tie off to highest spot possible.
| Step | Action |
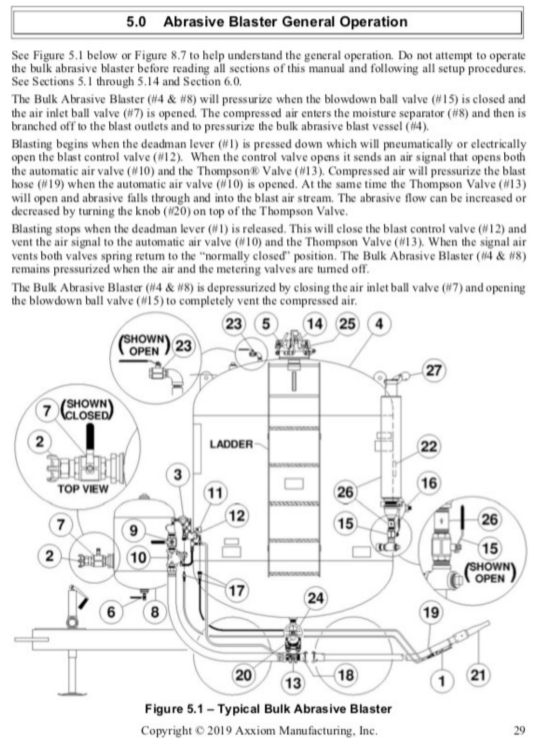
| 5.1 | Verify air supply valve is in the OFF position, and there is no air entering the blast machine. |
| 5.2 | Verify the air bleed off valve is in the OPEN position and there is no air pressure in the blast pot. |
| 5.3 | Open the lid of the blast pot. |
| 5.4 | Using forklift or crane, fill blast pot with super sacks of blast media using the following steps: 1. Hook bag straps to forks 2. Lift bag into position 3. Untie outer retaining string 4. Pull out discharge spout 5. Holding discharge spout closed, untie string 6. Manually open discharge spout and guide blast media into blast machine 7. Properly dispose of empty supersacks Note: To prevent spilling, don’t allow blast media to come out too quickly. Note: The first supersack can be used as a garbage container ! CAUTION: Only certified operators are allowed to operate forklifts and cranes. ! CAUTION: DO NOT overfill blast pot. ! CAUTION: Never go under or allow any other personnel under suspended loads ! CAUTION: Be aware of pinch points |
| 5.5 | Close lid and secure locking mechanisms. |
| 5.6 | Close the air bleed off valve. |
6. Start up the Blast Machine
Complete these steps to start up the blast machine:
| Step | Action |
| 6.1 | Start air compressor and let warm up. Note: Only trained personnel can operate Mandros equipment. Note: See SOG MPI – E004 |
| 6.2 | Verify all hoses are hooked up properly with whip checks, safety pins, and verify fittings on hoses are secure. |
| 6.3 | Verify blast machine lid is closed and locking mechanisms are secured properly. |
| 6.4 | Verify air bleed off valve is closed. |
| 6.5 | Verify all manual control switches are in the OFF position. |
| 6.6 | Verify all deadman controls are not engaged. |
| 6.7 | At blast pot, verify that the pusher line valves on the unused outlets are in the OFF position and the pusher line valves on the utilized outlets are in the ON position. |
| 6.8 | At blast pot, verify that the grit valves on the unused outlets are in the OFF position and the grit valves on the utilized outlets are in the ON position |
| 6.9 | Turn ON air supply from compressor to blast machine. |
| 6.10 | At Blast Machine Slowly turn ON air supply to blast machine and allow blast pot to fully pressurize. Note: Pressure gauge on the air compressor will come down while it’s pressurizing the pot and compressor will be running at a higher RPM. When compressor idles down and pressure stabilizes, the pot will be at working pressure. ! WARNING: Never open main air valves quickly, extreme amounts of air coming all at once from the compressor can over strain they system eventually resulting in damage to the equipment which could result in serious injury or death. |
| 6.11 | At blast pot, verify that the metering valves of the utilized outlets are in the correct position to get the right amount of blast media. Note: Adjustment may need to be made during blasting startup. |
| 6.12 | At work area, ensure blaster is prepared and the deadman control is in the OFF position. |
| 6.13 | At blast pot control panel, turn ON the manual control switches at the blast machine. ! CAUTION: The system is now live and will be controlled by the blasters until the manual control at the blastmachine is turned OFF. ! CAUTION: If any problems arise, immediately turn off manual control at blast machine. ! CAUTION: If for any reason turning off the manual control switch does not work, immediately turn off the valves at pusher lines, grit valves, and air supply to blast machine. Then release air pressure with the bleed off valve. |
7. Operating Blast Machine
Complete these steps to operate the blast machine.
| Step | Action |
| 7.1 | Adjust blast media as directed by Blaster or Foreman. To ensure correct amount of blast media is being used, you may need to adjust the metering valve to allow more or less media to flow through the system. Note: Blaster may give hand signals to turn grit up or down or may use radio communication to get amount of blast media dialed in. Hand Signals: Two fingers pointing up signals more media. Two fingers pointing down signals less media. Note: A surging sound indicates too much blast media. A whistling sound indicated too little blast media. |
| 7.2 | If a plug in the system occurs, you may need to “choke” the blast system by momentarily turning off the air supply to the pusher line. Note: There are typically 2 ways for the blaster to signal they need a choke. • Hand up to throat in a “choking” gesture • Turning on and off the hose 3 times in a row Note: First attempt, choke for approximately 2 seconds. If that does not clear the system, follow up with longer chokes until normal blasting resumes. Note: Some blast systems allow the blaster to choke the hose themselves. Note: If choking the hose does not resolve the problem, ask foreman for assistance. |
| 7.3 | During blasting process, the pot tender should monitor the blast pot and the proper operation of all equipment in the near vicinity: Blast Pot and Blast Hoses • Ensure there are no leaks in hoses or pressurized equipment and shut down blasters if anything malfunctions • Ensure hoses and control systems are operating properly and shut down blasters if anything malfunctions • Walk down hoses from time to time to verify everything is working Note: communicate with blasters by toggling the light control switch. • One time- indicates there is a problem, the blaster should wait until the problem is fixed. • Two times- indicates there is a problem and the blaster should come help fix the issue. • Three times- indicates break time, end of shift, or any other reason that everyone should come out. Equipment • Keep track of Fuel levels on equipment and refill as necessary • Check gauges on a regular basis to ensure equipment is operating within the correct operating parameters • Ensure blast media and dust from the blasting operation does not get on to or into equipment. ! CAUTION: The pot tender should never leave the blast pot unattended during blasting operation. ! CAUTION: If the pot tender does not have visibility of blasting operation, radio communication is required with someone near the blasting operation. |
| 7.4 | Manage the work area • Control the work area – keep unauthorized personnel out of and a safe distance from blasting equipment and blasting operation • Keep hoses out of traffic areas and keep traffic away from hoses and equipment • Keep work area clean and tidy |
| 7.5 | If the blasters are in line of sight, the pot tender may assist the blasters by: • Making sure there is a clear path for the blaster • Assisting blaster with access (ex. Move ladders) • Managing hoses as blaster moves • Monitoring blasting process as another set of eyes to ensure we are only blasting what is required and not causing damage or disruption to other persons or equipment. ! WARNING: Safety of Mandros personnel is our primary concern. Never enter an unsafe environment to assist blaster. |
8. Shutting Down Blast Operation for Day (To Resume Tomorrow)
| Step | Action |
| 8.1 | Turn OFF control switches. Note: toggle light switches to signal blasters they are being |
| 8.2 | Turn OFF air supply from air compressor. |
| 8.3 | Bleed off air pressure from blast machine and bleed pressure from hose. |
| 8.4 | Turn OFF air supply to the blast machine. |
| 8.5 | Turn OFF air supply to breathing system and bleed off air pressure. ! WARNING: Never turn off air supply to blast hoods until you verify each person has come out of the work area and taken off their blast hoods. |
| 8.6 | Let the compressor idle down for at least 20 minutes prior to shut down. |
| 8.7 | Load the pot for the next day. See step 5. |
| 8.8 | Roll up blast hose and breather hose. Note: If long sections of hose are utilized or staged where rolling up entire hose is inefficient, only roll up working sections to allow for efficient work and good housekeeping. |
| 8.9 | Cover blast media to prevent weather damage (getting wet). |
9. Shutting Down Blast Operation for the Job
Complete these steps to shut down the equipment for the job:
| Step | Action |
| 9.1 | Turn OFF control switches. Note: toggle light switches to signal blasters they are being turned off. |
| 9.2 | Turn OFF air supply from air compressor. |
| 9.3 | Bleed off air pressure from blast machine and bleed pressure from hose. |
| 9.4 | Turn OFF air supply to the blast machine. |
| 9.5 | Turn OFF air supply to breathing system and bleed off air pressure. ! WARNING: Never turn off air supply to blast hoods until you verify each person has come out of the work area and taken off their blast hoods. |
| 9.6 | Let compressor idle down for at least 10 minutes prior to shut down. |
| 9.7 | Disconnect control line from blast machine and blast hose. Note: Leave control line hooked up to whip section and roll it up with the whip. |
| 9.8 | Disconnect blast hoses. |
| 9.9 | Disconnect air supply hose. |
| 9.10 | Disconnect breather and breather hoses |
| 9.11 | Roll up all hoses and tape to keep in place. Note: If any hoses are defective or need repairs, either repair in the field (preferable) or red tag for repairs at the shop. |
| 9.12 | Load up equipment and supplies for the next job or return to the shop. Note: If returning to shop, ensure that everything gets put away in its proper place. Note: Loading heavy equipment may require additional personnel or lifting equipment (forklift). Note: Ensure that the loads are secure for transportation. ! WARNING: Ensure there is sufficient and stable flat ground for forklift to maneuver when loading equipment. ! WARNING: When moving bulk blast pots ensure that they are empty enough to be moved safely. ! WARNING: Ensure forklift has sufficient capacity to handle the weight of the pot and any leftover media that may be inside. |
| 9.13 | Ensure any blast media left over is covered to prevent damage and stored properly. |
10. Appendix A: Bulk Blasting Setup
11. Appendix B: General Operation
12. Appendix C: Air and Abrasive Consumption Rates

13. Appendix D: Knots