1. Set Up & Manage Job Site
Use the guideline for initial positioning of the equipment:
! CAUTION: Monitor spray or overspray and wind direction to prevent
potential impacts or damage to any vehicles or equipment. (Mandros,
Client, Public, etc.)
| Step | Action |
| 1.1 | Ensure equipment is upwind or crosswind and not in the line of overspray and dust, is out of high traffic areas and well marked/highly visible |
| 1.2 | Cover or move equipment when necessary to protect from overspray. ! CAUTION: Do not put protective covers on anything that could cause damage. DO NOT cover: • Moving parts • Air intake / air cooling components • Hot surfaces • Exhaust components |
| 1.3 | Verify that all equipment is stable and level. |
| 1.4 | Verify that wheels are chocked. Note: Set orange safety cones where applicable. |
| 1.5 | Ensure proper use and care of equipment. • Inspection forms are completed • Equipment is used as designed and per manufacturers recommendations. |
| 1.6 | Control regulated area by: • Not allowing unauthorized personnel in the work area. • Flag and tag or control the boundaries of the work area to manage the safety of personnel, minimize potential damage and maximize the probability of success (i.e., paint spills, paint contamination) |
| 1.7 | Ensure the work area is clean and tidy. |
| 1.8 | Ensure proper explosion proof lighting is set up to complete the coating project safely and successfully when working inside or in a confined space. |
| 1.9 | Monitor spray or overspray and wind direction to prevent potential impacts or damage to other equipment. |
2. Set Up Pump
| Step | Action |
| 2.1 | Verify there are protective coverings under mix area, spray area or paint sprayer staging area to prevent spills on floors, concrete, asphalt or any other surface. |
| 2.2 | Verify the area is sufficiently flat so that equipment will not easily tip or spill. |
| 2.3 | Verify the area is out of traffic or walkways unless clearly marked, and is upwind or crosswind of spray process (or covered). |
| 2.4 | Verify the area is staged as close as possible to the work area to avoid stretching hoses or tipping sprayer, and far enough away from spray areas that it reduces the potential for overspray on equipment. |
| 2.5 | Verify all PPE is available and in good condition. |
| 2.6 | Inspect the following items to verify that all components are in good condition and working properly. Visually inspect for damage, missing parts, dried/ cured paint, or overspray that may hinder operation. • Pump • Hoses • Air Supply • Gun • Tips • Rack |
| 2.7 | Review with your foreman the coating system requirements and verify that the correct material is being used. |
| 2.8 | Review SDS to understand how to safely work with the materials being used. ! WARNING – Understanding materials is important for protecting health and proper selection of PPE (respiratory protection). |
| 2.9 | Review PDS to understand the properties of the materials and verify the correct application equipment is being used. • Surface preparation requirements • Application equipment • Environmental conditions • Application procedure • Pot life • Dry/cure times • Recoat windows • Shelf life • Mixing ratios • Induction times / Sweat-In times Note: Refer to MPI-1203 |
| 2.10 | Ground the sprayer. |
| 2.11 | Check packing nut. (See Appendix) • Fill with Throat Seal Liquid. • Ensure packing nut is tight, torque to 25-30 ft lb |
| 2.12 | Verify the correct pump and tip size. Note: Understand the pump to line ratio. |
| 2.13 | Attach fluid hose to pump outlet and tighten. |
| 2.14 | Attach fluid hose to gun and tighten. Note: Check that all pressure connections are tight. |
| 2.15 | Verify oil is in cup and installed between pump and water separator. Note: Air / Water Separator is installed on supplied airline. |
| 2.16 | Close bleed type master air valve. Connect air supply hose to 1 in NPT air inlet. |
| 2.17 | Flush and prime before using. |
3. Pressure Relief Procedure
The following guideline should be used when following the Pressure Relief
Procedure:
Follow the Pressure Relief Procedure whenever you see this symbol:
CAUTION: This equipment stays pressurized until pressure is manually relieved. To help prevent serious injury from pressurized fluid, such as skin injection, splashing fluid, and moving parts, follow the Pressure Relief Procedure when you stop spraying and before cleaning, checking, or servicing equipment.
| Step | Action |
| 3.1 | Engage gun trigger lock. |
| 3.2 | Close bleed type master air valve. |
| 3.3 | Disengage gun trigger lock. |
| 3.4 | Hold gun firmly against a grounded metal pail. Trigger the gun until pressure is relieved. |
| 3.5 | Engage trigger lock. |
| 3.6 | Drain fluid. • To drain fluid, slowly open all fluid drain valves, including drain/purge valve, in system into a waste pail. If there is a return tube, open return line ball valve. |
| 3.7 | Close valve after fluid is drained. |
| 3.8 | If you suspect the spray tip or hose is clogged or that pressure has not been fully relieved: • VERY SLOWLY loosen tip guard retaining nut or hose end coupling to relieve pressure gradually. • Loosen nut or coupling completely. • Clear hose or tip obstruction. |
4. Flush
The following guideline should be used when flushing the pump:
! WARNING: To avoid fire and explosion, always ground equipment and waste container. To avoid static sparking and injury from splashing, always flush at the lowest possible pressure.
| Step | Action |
| 4.1 | Flush the pump: • Before use • When changing colors or fluids • Before repairing equipment • Before fluid dries or settles out in a dormant pump o Check the pot life of catalized fluids • At the end of the day • Before storing the pump |
| 4.2 | Flush at the lowest pressure possible. Note: Flush with a solvent that is compatible with the material you are pumping and with the wetted parts in your system. Note: Check with your material manufacturer or supplier for recommended flushing solvent and flushing frequency. |
| 4.3 | Follow Pressure Relief Procedure (section 3, above) |
| 4.4 | Remove tip and tip guard from gun. |
| 4.5 | If desired, remove fluid filter. Reinstall filter cap after removing fluid filter. |
| 4.6 | Place suction tube in a compatible solvent. Note: Do not stretch hose tight. Let the hose hang to assist fluid flow into the pump. |
| 4.7 | Turn regulator adjustment knob counter clockwise until it stops, and gauge reads zero. |
| 4.8 | Open bleed type master valve. |
| 4.9 | Flush hose and gun. • Disengage gun trigger lock. • Hold the gun against a bucket. • Trigger gun, slowly open regulator adjustment knob until pump begins to cycle and a steady stream comes from gun. • Trigger gun for 10-15 seconds, until solvent runs clear. • After solvent runs clean, turn the regulator adjustment knob counter clockwise until it stops and the gauge reads zero. The pump will stop. Once the material stops flowing, release the trigger and engage the trigger lock. Stop the pump with the rod buried in the pump. • Close the bleed type master valve. |
| 4.10 | If flushing through drain/purge valve: • Place drain tube in a waste bucket. Open drain/purge valve slightly by rotating counter clockwise. • Start the pump by rotating the air regulator adjustment knob clockwise until pump begins to move. • When clean solvent flows from the drain tube close drain/purge valve by rotating clockwise. Pump will stall. • Stop the pump with the rod buried in the pump. • Follow Pressure Relief Procedure (section 3, above). Leave solvent in and store sprayer. |
| 4.11 | Remove fluid filter and soak in solvent. Replace filter cap. |
5. Prime
| Step | Action |
| 5.1 | Follow Pressure Relief Procedure (section 3, above). |
| 5.2 | Lock gun trigger. Remove tip and tip guard from gun. |
| 5.3 | Place suction tube in the material that will be sprayed. Note: Do not stretch hose tight. Let it hang to assist fluid flow into the pump. |
| 5.4 | Turn regulator adjustment knob counter clockwise until it stops, and the gauge reads zero. |
| 5.5 | Open bleed type master valve. |
| 5.6 | Prime through drain valve if necessary. Note: Usually necessary with high viscosity / thicker materials ! CAUTION: Do not prime pump through drain/purge valve using two component materials. Mixed two component materials will harden in valve and result in clogging. • Place drain tube in a waste bucket. Open drain/purge valve slightly by rotating counter clockwise. • Start the pump by rotating the air regulator adjustment knob clockwise until pump begins to move. |
| 5.7 | Prime hose and gun. • Disengage gun trigger lock. • Hold gun against a bucket. • Trigger gun, slowly open regulator adjustment knob until pump begins to cycle and a steady stream comes from gun. o Trigger gun until coating material comes out and 5 seconds more. • Engage trigger lock. |
| 5.8 | The equipment is now ready to spray. |
6. Spray
The following guideline should be used when spraying.
! CAUTION: DO NOT allow pump to run dry. It will quickly accelerate to a high speed, causing damage.
| Step | Action |
| 6.1 | Prime. See section 5 (above). |
| 6.2 | Follow Pressure Relief Procedure (section 3, above). |
| 6.3 | Install the tip and tip guard on gun. |
| 6.4 | Open bleed type master valve. |
| 6.5 | Turn regulator adjustment knob until gauge reads desired pressure. Turn clockwise to increase pressure, counter clockwise to decrease pressure. |
| 6.6 | Disengage the gun trigger lock. |
| 6.7 | Spray a test pattern. Note: Read coating manufacturer’s recommendations. Note: Adjust pressure as necessary. Note: During spray operation pump may freeze. Consult supervisor. |
| 6.8 | Flush when you are done spraying. |
| 6.9 | Follow Pressure Relief Procedure. |
7. Manage Pot & Materials During Spray Process & Assist in the
Coating Process
Complete these steps to manage the spray pot and assist in the coatings
process.
| Step | Action |
| 7.1 | Manage the storage and organization of materials. • All materials must be in properly labeled containers • Lids or caps must be secured on all containers when not in use • Paint and coating materials in use should always be covered with plastic or a rag to prevent dust and debris contamination • Ensure materials and solvents are stored in a well ventilated and secure location out of weather that may enter the containers. • Ensure materials are stored in environmental conditions in accordance with PDS requirements. • Materials should be sorted into like components and like kits to avoid accidental miss-match and miss-mix. Materials should always be stored in a tidy and organized manner with labels and handles facing forward for easy identification and handling. |
| 7.2 | Move paint sprayer around as necessary to facilitate ease of work for the painter. Note: Keep the sprayer from tipping. Keep clean and full of material. |
| 7.3 | Look at where the painter is going before they get there. ! WARNING – Safety of MPI personnel is priority when performing any task. DO NOT put yourself in harm’s way when assisting painter. • Guide hoses around obstacles • Verify the painter has a clear path • Move ladders, rigging and help facilitate access to work area |
| 7.4 | Assist painter in identifying holidays or light spots. |
| 7.5 | Monitor overspray and wind direction. |
| 7.6 | Verify that items not requiring paint are protected. |
| 7.7 | Move lighting around during the painting process to ensure the painter has a great view of the work. |
8. Shut Down
The following guideline should be used when shutting down equipment:
! CAUTION: Never leave water or water-base fluid in pump over night. If you are pumping water-base fluid, flush with water first, then with a rust inhibitor, such as mineral spirits. Relieve pressure, but leave rust inhibitor in pump to protect parts from corrosion.
| Step | Action |
| 8.1 | Follow Pressure Relief Procedure. (Steps 3.1- 3.8) |
| 8.2 | Always flush the pump before the fluid dries / cures. (Steps 4.1- 4.11) |
| 8.3 | Clean the suction tube. |
| 8.4 | Remove the tip and tip guard and clean. |
| 8.5 | Use a brush to clean overspray from the gun. |
| 8.6 | Replace the tip and tip guard back onto the gun and flush with solvent. |
9. Site Cleanup
The following guideline should be used to perform daily or end of project
cleanup / housekeeping activities:
| Step | Action |
| 9.1 | Manage coating materials and solvents properly. • Store in properly labeled containers. • Lids or caps must be secured on all containers . • Ensure materials and solvents are stored in a well ventilated and secure location out of weather that may enter the containers or damage labels. • Ensure materials are stored in environmental conditions in accordance with product data sheet requirements. • Materials should be sorted into like components and like kits to avoid accidental miss match and miss mix. • Materials should always be stored in an tidy and organized manner with labels and handles facing forward for easy identification and handling. |
| 9.2 | Roll up hoses and put away or store in an organized way. • Roll up neatly. • Secure end of hoses with tape or wire to prevent damage from banging around. • Hook ends of hoses together or cover to prevent foreign material from entering (dust and grit that gets in hoses will seriously damage equipment). • Stack neatly in their proper place • When hoses are left out for use the next day they must be left in an organized manner o Rolled up as much as possible o Out of walkways and roadways o Ends left hooked up to equipment, covered, or placed in a manner to prevent foreign material from entering hose ends (dust and grit that gets in hoses will seriously damage equipment) o Clearly marked |
| 9.3 | Clean up painting equipment and store securely in Mandros tool trailers. |
| 9.4 | Remove masking from the work area when work areas are completed as soon as practical. |
| 9.5 | Remove coverings from the work area when work areas are completed as soon as practical. Ensure coverings are secure if leaving in place for upcoming work. |
| 9.6 | Clean up drop cloths, fold up, and put away or place securely when leaving in place for upcoming work. |
| 9.7 | Dispose of all trash into appropriate garbage containers. |
| 9.8 | Complete any other clean up or general tasks that may be required to leave the site in a neat, tidy and safe condition. • Sweeping. • Cleaning off overspray. • Put up or remove flagging as necessary. • Put up and take down “wet paint” signs when appropriate. • Replace any removed hardware. • Relocate any moved items or equipment. • Remove locks and sign off tag-outs when appropriate. • Sign off clearances when appropriate. • Walk down work site with your foreman to ensure they are satisfied with the condition of the work site. |
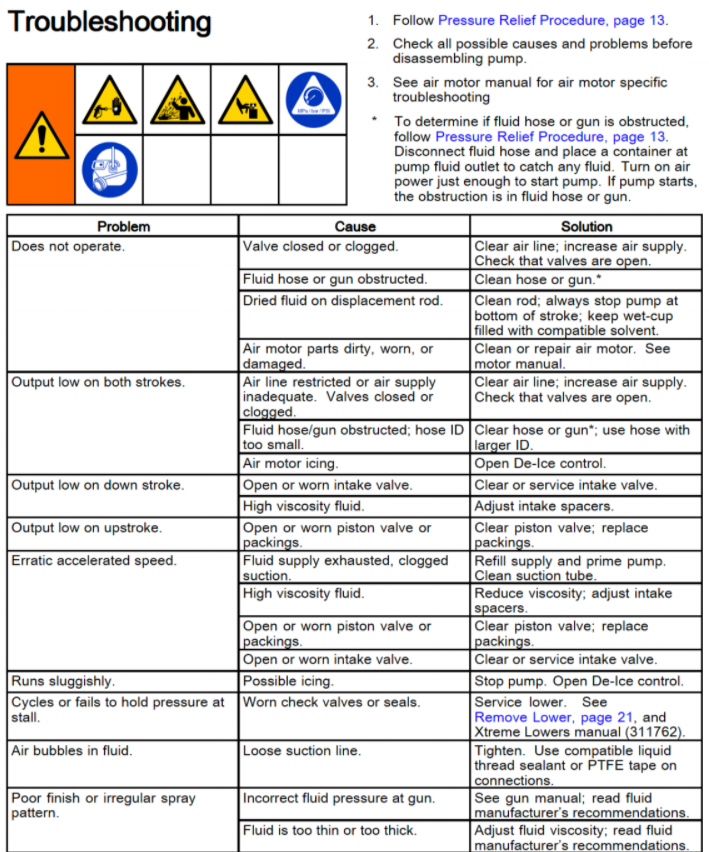
10. Troubleshooting
11. Appendix A: