1. Set Up & Manage Work Area
Complete these steps to set up and manage the job site:
CAUTION: Monitor spray or over spray and wind direction to prevent potential impacts or damage to any vehicles or equipment. (Mandros, Client, Public, etc.)
| Step | Action |
| 1.1 | Ensure equipment is upwind or crosswind, not in the line of overspray and dust, is out of high traffic areas, and is well-marked/highly visible |
| 1.2 | Cover or move equipment and vehicles when necessary to protect from overspray. ! CAUTION: Do not put protective coverings on anything that could cause damage. |
| 1.3 | Verify that all equipment is stable and level. |
| 1.4 | Verify that wheels are chocked. Note: Set orange safety cones where applicable. |
| 1.5 | Ensure proper use and care of equipment. • Inspection forms are completed • Equipment is used as designed and per manufacturers recommendations. |
| 1.6 | Control regulated area by: • Not allowing unauthorized personnel in the work area. • Flag and tag or control the boundaries of the work area to manage the safety of personnel, minimize potential damage, and maximize the probability of success (i.e., paint spills,paint contamination). |
| 1.7 | Ensure the work area is clean and tidy. |
| 1.8 | Ensure proper explosion proof lighting is set up to complete the coating project safely and successfully when working inside or in a confined space. |
| 1.9 | Monitor spray or overspray and wind direction to prevent potential impacts or damage to other equipment. |
2. Set Up and Manage Spray Equipment
Complete these steps to set up and manage spray equipment:
| Step | Action |
| 2.1 | Verify there are protective coverings under mix area, spray area or paint pot staging area to prevent spills on floors, concrete, asphalt or any other finished surface. |
| 2.2 | Verify the area is sufficiently flat so equipment will not easily tip or spill. |
| 2.3 | Verify the area is out of traffic or walkways unless clearly marked and is upwind or crosswind of spray process or covered. |
| 2.4 | Verify the area is staged as close as possible to the work area to avoid stretching hoses or tipping pots, and far enough away from spray areas that it reduces the potential for overspray on paint pot. ! CAUTION: When paint pots get tipped over the paint material gets into the regulators and prevents them from working properly. |
3. Spray Equipment Inspection
Complete these steps when inspecting the equipment:
| Step | Action |
| 3.1 | Verify gauges are readable. |
| 3.2 | Verify lid gasket is in good condition. |
| 3.3 | Verify paint pot pressure rating is appropriate for output pressure of compressor, or ensure regulator is functioning properly. ! CAUTION: Never allow pot pressure to exceed maximum working pressure of paint pot. Note: Compressor output is 125 PSI or greater, pressure can be adjusted on the compressor by a properly trained team member. |
| 3.4 | Verify pop off is clean, free of paint, working properly, and rated to release at a pressure less than pressure limit of pot. Note: Pressure limit is stamped on a metal tag on the side of the pot and pressure rating will be stamped on pop off valve. |
| 3.5 | Verify tightening screws are clean and free of excess paint that may prevent them from closing all the way. |
| 3.6 | Verify all valves are working properly. |
| 3.7 | Verify regulators are working properly. |
| 3.8 | Inspect all spray equipment parts for: • Missing parts • Broken parts • Checking that equipment moves freely |
4. Flush Spray Equipment
Complete these steps when flushing the spray equipment:
| Step | Action |
| 4.1 | Connect air hoses to compressor. ! WARNING – Whip checks and safety pins must be in place. |
| 4.2 | Verify all valves are in the off position. Note: When valves are parallel to the pipe they are in the ON position, when they are perpendicular to the pipe, they are in the OFF position. |
| 4.3 | Turn ON the air compressor. |
| 4.4 | Hook up enough air hose to reach the paint pot. ! WARNING – Whip checks and safety pins must be in place at each connection. |
| 4.5 | Blow out air hose to ensure grit, dirt, or any other contamination does not get into paint pot. Note: One person should hold the hose securely and a second person should crack the air valve on the compressor to purge the hose with air. If possible, use valve. ! WARNING – Point the hose in a safe direction, away from any people, equipment, or surface that could be damaged or cause flying debris. |
| 4.6 | Attach air hose to paint pot ! WARNING – Whip checks and safety pins must be in place. |
| 4.7 | Remove lid and fill paint pot with 1 gallon of clean solvent. |
| 4.8 | Secure lid to paint pot. Note: Thumb screws should be tightened two at a time and across from one another to allow for even tightening pressure. Note: Clamps must be positioned to allow thumb screws to engaged retaining “lip” on lid. ! WARNING – If thumb screws and clamps are not situated properly on lid there is a potential for the lid to blow off the pot when pressurized. |
| 4.9 | CLOSE air inlet valve on spray pot. |
| 4.10 | CLOSE air outlet valve from the pot to the spray gun. |
| 4.11 | Turn air pressure all the way OFF by screwing out or turning inlet regulator counter clockwise. |
| 4.12 | Turn air ON at the air compressor. |
| 4.13 | Slowly OPEN inlet. Note: Air will NOT be heard entering the paint pot. |
| 4.14 | Slowly OPEN the air inlet regulator by turning the regulator in or clockwise. Note: Air will be heard entering / filling the pot. |
| 4.15 | Increase the air pressure to 10-15 PSI. |
| 4.16 | Verify that there are no leaks in the system. |
| 4.17 | Point and trigger the spray gun into a bucket. ! WARNING – Potential for solvent splash wear proper PPE / Use proper spray direction to prevent splash. Note: The clean solvent within the pot will flow through the hoses and out of the gun. |
| 4.18 | Verify that the solvent flows through clean and all equipment is working properly. |
| 4.19 | Spray all of the solvent into the bucket and dispose of it properly. Note: Reference MPI-1207 Waste Disposal. |
| 4.20 | Turn OFF the air to the paint pot from the air compressor. |
| 4.21 | OPEN the paint pot bleed off valve to bleed the air pressure. Note: Air pressure can also be blead off through the high pressure pop off valve |
| 4.22 | Verify the pot pressure gauge reads 0 PSI. |
| 4.23 | Remove the lid. |
5. Managing Paint/Coating Materials
Complete these steps to manage paint or coating materials:
Note: Refer to Guideline MPI – 1205: Mixing Paint for further information pertaining to this section.
| Step | Action |
| 5.1 | Review and understand the SDS (Safety Data Sheet). • Hazards associated with the product • Protective measures needed when using the materials |
| 5.2 | Review the PDS (Product Data Sheet) and AIS. Understand the following: • Surface preparation requirements • Application equipment • Environmental conditions • Application procedure • Pot life • Dry/cure times • Recoat windows • Shelf life • Mixing ratios • Induction times / Sweat-In times |
| 5.3 | Manage the storage and organization of materials. • All materials must be in properly labeled containers • Lids or caps must be secured on all containers when not in use • Paint and coating materials in use should always be covered with plastic or a rag to prevent dust and debris contamination • Ensure materials and solvents are stored in a well ventilated and secure location out of weather that may enter the containers. • Ensure materials are stored in environmental conditions in accordance with PDS requirements. • Materials should be sorted into like components and like kits to avoid accidental miss match and miss-mix. • Materials should always be stored in a tidy and organized manner with labels and handles facing forward for easy identification and handling. |
6. Load Spray Pot
Complete these steps to load the spray pot:
Note: Paint must be mixed per MPI-1205: Mixing Paint.
| Step | Action |
| 6.1 | Wipe the interior of the spray pot clean with a damp rag. |
| 6.2 | Strain mixed paint into paint pot, no more than 3/4 full. Note: Alternatively, if painting smaller areas or to minimize clean up, place 1-gallon bucket of paint into paint pot. Note: Some coatings do not allow for straining (ex: zinc, flake). |
| 6.3 | Secure lid to paint pot. Note: Thumb screws should be tightened two at a time and across from one another to allow for even tightening pressure. Note: Clamps must be positioned to allow thumb screws to engaged retaining “lip” on lid. ! WARNING – If thumb screws and clamps are not situated properly on lid there is a potential for the lid to blow off the pot when pressurized. |
| 6.4 | CLOSE inlet valve on spray pot. |
| 6.5 | CLOSE air outlet valve from the pot to the gun. |
| 6.6 | CLOSE inlet regulator by screwing out or counter clockwise. |
| 6.7 | Turn air ON from the air compressor. |
| 6.8 | Slowly OPEN inlet. Note: Air will NOT be heard entering the paint pot. |
| 6.9 | Slowly OPEN the air inlet regulator by turning the regulator in or clockwise. Note: Air will be heard entering / filling the pot. |
| 6.10 | Increase the air pressure to 10-15 PSI. |
| 6.11 | Verify there are no significant leaks in the system. |
| 6.12 | Point and trigger the spray gun to purge any remaining solvent that was in hoses out the gun into a bucket. ! WARNING – Potential for solvent splash wear proper PPE / Use proper spray direction to prevent splash. |
7. Set Up Spray Pot & Gun
Complete these steps to set up the spray pot and spray gun:
Note: At this point the spray pot is pressurized, full of paint, and material line
to the gun is also full of paint. Now it’s time to set up the fan on the gun.
Note: This will primarily be the responsibility of the painter, but the pot
tender should also understand the basics.
| Step | Action |
| 7.1 | Turn ON the air supply to the gun. |
| 7.2 | Turn ON the air supply regulator when equipped or adjust the cheater valve on the gun to achieve sufficient air flow through the air cap to create a good “fan” spray pattern. |
| 7.3 | There are 4 adjustments that you will need to dial in to get a good paint pattern: 1. Material adjusting screw on gun a. Regulates how much material comes out of spray gun 2.Fan adjusting screw on gun a. Regulates the size of the spray pattern 3.Fluid pressure regulator a. Regulates the pressure and rate the material comes out of the pot 4.Air pressure regulator (on pot) and/or cheater valve on gun a. Regulates the air pressure coming out of the air cap on gun Note: Refer to PDS for guidance on pressure settings. Environmental conditions and equipment set up an effect pressure requirement. Note: Reference Appendix A for additional information. |
8. Manage Pot During Spray Process & Assist in the Coating
Process
Complete these steps to manage the spray pot and assist in the coatings
process:
| Step | Action |
| 8.1 | Move paint pot around as necessary to facilitate ease of work for the painter. Note: Keep the pot from tipping. Keep clean and full of material. ! WARNING – Depressurize the pot prior to moving or filling. Note: Reference Section 4.20-4.22 for depressurizing steps. |
| 8.2 | Look at where the painter is going before they get there. ! WARNING – Safety of MPI personnel is priority when performing any task. Never put yourself in harm’s way to assist the painter. • Guide hoses around obstacles • Verify the painter has a clear path • Move ladders, rigging, and help facilitate access for painter. |
| 8.3 | Assist painter in identifying holidays or light spots. |
| 8.4 | Monitor overspray and wind direction. |
| 8.5 | Verify that items not requiring paint are protected. |
| 8.6 | Move lighting around during the painting process to ensure the painter has a great view of the work. |
9. Clean Spray Pot & Gun
Complete these steps to clean the spray pot and gun:
Note: Clean the spray gun with solvent from time to time throughout the day so
that paint does not build up or dry on the gun.
| Step | Action |
| 9.1 | Turn OFF the air supply to the paint pot. |
| 9.2 | OPEN the paint pot bleed off valve to bleed the air pressure. Note: Air pressure can also be blead off through the high pressure pop off valve |
| 9.3 | Verify the pot pressure gauge reads 0 PSI. |
| 9.4 | Turn T-handle adjusting screw on tank fluid pressure regulator counter clockwise until no spring pressure is felt |
| 9.5 | Loosen thumb screws and tip clamps back and tip lid and tip to one side of tank. |
| 9.6 | Using solvent and a paint brush, clean the inside of the tank and any parts that came into contact with the material. Note: This may require multiple washes, as the solvent will get dirty quickly at first. Always use clean solvent for the final rinse. |
| 9.7 | When cleaning the inside of the tank, clean the outside of the gun. Note: Screw out the adjustment screws so the full range of motion is being cleaned on all the moving parts of the spray gun. Note: Reference Attachment B. |
| 9.8 | After all equipment is cleaned thoroughly with clean solvent, pour clean solvent into the tank. |
| 9.9 | Replace the lid and tighten the thumb screws. |
| 9.10 | Verify air outlet valve on pot is in the OFF position. |
| 9.11 | Pressurize the pot. |
| 9.12 | Verify there are no significant air leaks. |
| 9.13 | Point and trigger the spray gun into a bucket. • The clean solvent within the pot will flow through the hoses and out of the gun. • If the solvent isn’t coming through completely clean, repeat the flush as many times as necessary to ensure hoses and gun components are completely clean and free of any coating residue. ! CAUTION:Any coating residue left in or on the system will cause damage to the equipment and will most likely result in disruptions the next time the equipment is used. It also adds increased and/or unnecessary maintenance and costs. |
| 9.14 | Spray all of the solvent into the bucket and dispose of properly. Note: Reference MPI-1207 waste disposal. |
| 9.15 | Turn OFF the air to the paint pot from the air compressor. |
| 9.16 | OPEN the paint pot bleed off valve to bleed the air pressure. |
| 9.17 | Verify the pot pressure gauge reads 0 PSI. |
| 9.18 | Loosen the lid. |
| 9.19 | Apply lubricant to fluid needle at packing nut and air valve at packing nut. |
10. Site Cleanup
The following guideline should be used to perform daily or end of project
cleanup / housekeeping activities:
| Step | Action |
| 10.1 | Manage coating materials and solvents properly. • Store in properly labeled containers. • Lids or caps must be secured on all containers. • Ensure materials and solvents are stored in a well ventilated and secure location out of weather that may enter the containers or damage labels. • Ensure materials are stored in environmental conditions in accordance with product data sheet requirements. • Materials should be sorted into like components and like kits to avoid accidental miss-match and miss-mix. • Materials should always be stored in a tidy and organized manner with labels and handles facing forward for easy identification and handling. |
| 10.2 | Roll up hoses and put away or store in an organized way. • Roll up neatly. • Secure end of hoses with tape or wire to prevent damage from banging around. • Hook ends of hoses together or cover to prevent foreign material from entering (dust and grit that gets in hoses will seriously damage equipment). • Stack neatly in their proper place • When hoses are left out for use the next day, they must be left in an organized manner o Rolled up as much as possible o Out of walkways and roadways o Ends left hooked up to equipment, covered, or placed in a manner to prevent foreign material from entering hose ends (dust and grit that gets in hoses will seriously damage equipment) o Clearly marked |
| 10.3 | Clean up painting equipment and store securely in MPI tool trailers. |
| 10.4 | Remove masking from the work area when work areas are completed as soon as practical. |
| 10.5 | Remove coverings from the work area when work areas are completed as soon as practical. Ensure coverings are secure if leaving in place for upcoming work. |
| 10.6 | Clean up drop cloths, fold up, and put away or place securely when leaving in place for upcoming work. |
| 10.7 | Dispose of all trash into appropriate garbage containers. |
| 10.8 | Complete any other clean up or general tasks that may be required to leave the site in a neat, tidy and safe condition. • Sweeping. • Cleaning off overspray. • Put up or remove flagging as necessary. • Put up and take down “wet paint” signs when appropriate. • Replace any removed hardware. • Relocate any moved items or equipment. • Remove locks and sign off tag-outs when appropriate. • Sign off clearances when appropriate. • Walk down work site with your foreman to ensure they are satisfied with the condition of the work site. |
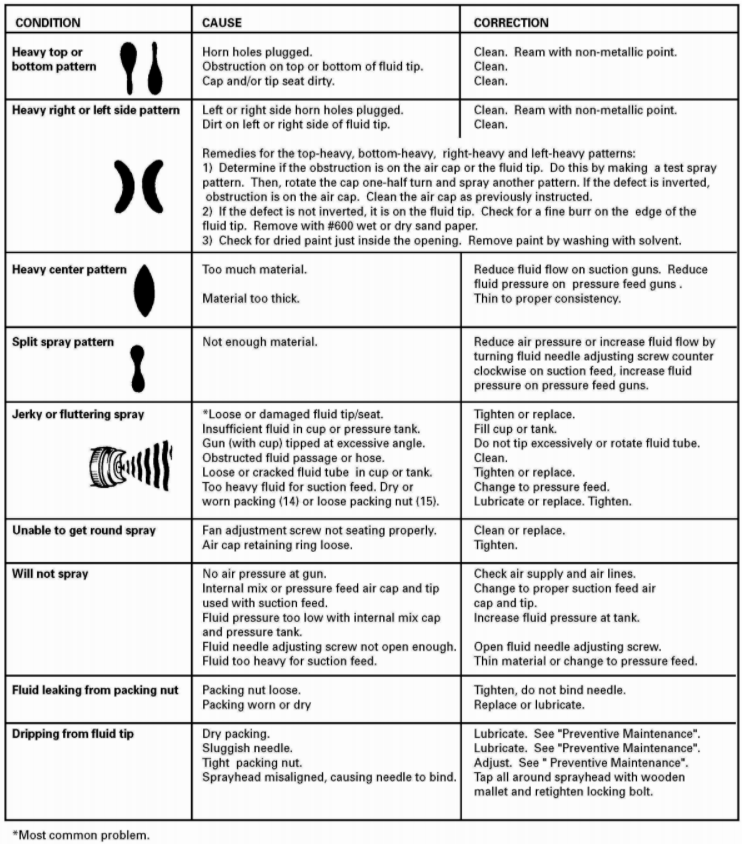
11. Appendix A: Troubleshooting
12. Appendix B: Gun Diagram

13. Appendix C: MBC-510 Spray Gun

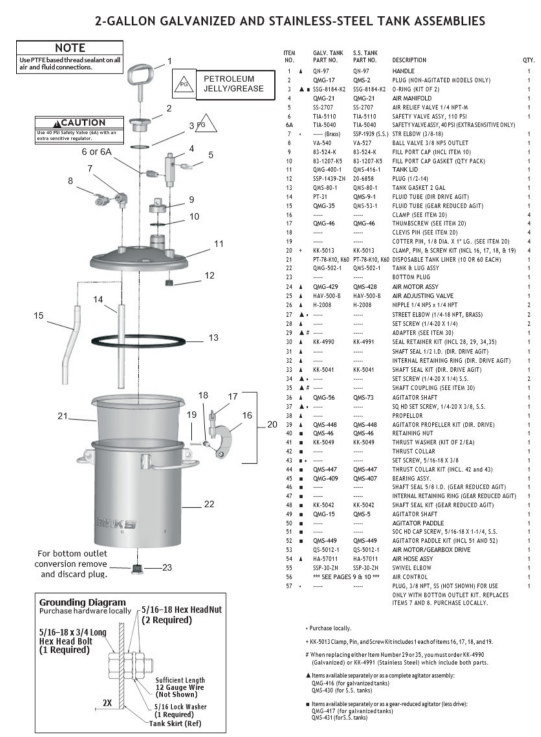
14. Appendix D: 2 Gallon Tank Assembly